
The Luthier Craft
The Secret art, craft, and science of the luthier
Barry E. Ebersole Ph.D. (Medieval Music Performance & Organology)
Luthier means string instrument maker – luthier comes from luth, a medieval word shift from al oud or oud, lude, luth, lute – the medieval lute. Literally, a luthier is a lute maker. Medieval luthiering is VERY different than modern luthering, although a knowledge of modern techniques and skills are helpful, many new skills and concepts must be mastered to revive this lost craft. I hold firmly to the belief that modern luthiering is degenerated from a higher form, de-evolved, in favor of quick, cheap, construction to get the product out the door faster at a lower cost. This statement will step on a lot of toes and bruise many egos. The fact is, in the Middle Ages, luthier class instruments (with the exception of large body instruments such as lutes) were made from the solid -- carved from the whole block of wood. The body, and ribs, were carved, not pieced from slabs of wood bent to conform to a shape. When the body -- back and ribs -- are carved from the solid, there is no stress from bending, and the grain matches, unbroken, from ribs to back! The sound is clear and response much better than the later method. I suggest that the medieval luthier achieved perfection (technique and function) later luthiers achieved modern types of instruments, but lost the perfect way to make them.
The medieval luthier techniques described here are for recreating medieval musical instruments -- however -- one could make modern instruments as well using there techniques, and produce a superior musical instrument.
Few people around the world have taken on the medieval luthier arts due to the enormous scope and daunting learning curve as well as the ample tooling and material costs. I have run many classes outlining the process of instrument construction, so there is interest. This small overview should allow one to gain a foundation to start. This is a guide only – an in-depth instruction with the information one needs would fill several books and be far beyond the scope of this article.
The model – patterns for making the instrument
The wood – cuts and types of wood.
Mystic numbers, magic and golden circles
Tolerances – carving – musical instrument tolerances for tone
Tuning – strings and vibrating length (gut or wire)
speciality tools – reamers, calipers, clamps, jigs, ...
Glue – period – animal glue
Rose & sound holes – the art – carving figures
Furnishings – tailpiece, bridge, nut, fingerboard, endpin, pegs, and keys
Marquetry – inlays and overlays
Finishing – surface prep sealer, oil varnish, and polish.
Setup – the art
of making the instrument playable
Not every conceivable question that could be answered will be here – The volume of material and data necessary to do so would and does fill large books on the subject of the luthering craft. I have two books on just varnish. If wood could have been worked with period mill power tools such as water, wind, or muscle-mechanical (foot powered treadle lathe or bow drill) modern equivalents were used as appropriate substitutes. If the work warranted hand tools or required them, I used them – the list includes:
Hand finger-powered twist drills, scrapers (made by me), some hand saws (coping, fret, hack, finishing and jewelers), hammer and chisels, planes, knives, gouges, files, reamers, and calipers. In all cases, hand tools are used, when finishing inside the walls and back of an instrument – this is done with hand tools – hammer and chisel, scrapers and such. Power tools are too rough and split and ruin the very thin wood when carving. One must feel the proper amount of flex and bend to the instrument to know when the tolerances are correct and tap for tone and response. This is a hands on process.
Authenticity is the all guiding principal with construction – Materials, tools, and methods of construction – which includes carving from the solid block for fiddles and other similar instruments. All these items are as close to period as can be determined. The examination of construction techniques from either period or as early as one can find examples (only a hand full or luthier class instruments exist and all but one is from a dig and only one is complete in its original form so that it may be played -- a fourteenth century harp from Ireland found in a bog). Study of luthier techniques from the Middle East and Eastern Europe also are windows to the past for authenticity.
Several items were purchased for the project - tuning pegs, strip marquetry (which I then matched and created other art from the basic strips), gut strings, and brass rod.
These items are purchased due to speciality skill or equipment I do not have or due to time – I can make gut strings and have but this is a specialty requiring much time and effort that would detract from the making of instruments – I have made and do make marquetry from raw materials but the strips greatly reduce the time needed to finish an instrument – although some marquetry was still made from scratch by me (ivory and horn inlays were not purchased but made by me).
Other decoration is made by me – the rose, ivory and horn marquetry, ivory triangles inlays (ivory is from old piano key ivory, available and legal).
The wood for musical instruments:
before you start making anything you must choose the proper wood. Archeological remains and documents from the period, as well as luthier tradition give us a list of proper instrument woods. Fruit and nut woods, box wood, maple (English sycamore) and occasionally some exotics imported from Africa and India, black wood, rose wood, and related available exotics from these areas. Woods from the Americas is not available until the late Renaisssance – such as birds eye maple, mountain mahogany, yellow box wood, palasander, kings wood, and pernambuco. The hard woods are for the box, neck and furnishings. The top, or table, is made of Spanish cedar (not red cedar) or spruce. The top wood needs to be quarter sawn. Thickness depends on the instrument being built, however, most are one eighth inch thick, not getting any thicker than three sixteenth of an inch on some larger instruments. The issue with using oak (surviving two rottas found out of oak) is that oak survives well due to the high tannin levels in the wood, but, is unstable – changes radically with humidity and climatic changes resulting in breakage, inability to keep in tune, and other undesirable results. Many rotta bridges have been found but the instruments were constructed of other woods that did not survive the ravages of time (some of maple have been found). Oak is not the only wood these instruments were made of and is not a good instrument wood – unless you intend on preserving it in a grave for a thousand years, then yes, by all means, use oak.
Burl – Luthiers do not use burl – period – the end. Burl is brittle, prone to cracks when thin, stiff and unresponsive to sound vibrations, and the grain does not run straight as is desired when quarter cut.
Flamed wood – Use of flamed and decorative wood grain in the luthier craft dates to the mid 16th century. The use of the decorative woods, seems to be assumed to be a time out of memory type of material for use in constructing musical instruments – NOT SO! The history of how , when and why this decorative wood came into use is known and well documented. In the Renaissance, 16th century, with the push of the Ottoman Empire, wood from Turkey (the major source of maple and other hard woods for Italy) was selected by the Turks for its wavy pattern – so the oars for Italy’s war galleys would be weak, and more likely to break. This wood with the wavy grain was also the source for the Italian luthiers. The Italian instruments had the highest esteem and reputation influencing luthiers in other countries to emulate the choice of wood for the wavy grain and decorative wood. The use of these woods earlier than 1550 is not common – only accidental. It is completely unhistorical and unwarranted to use these decorative woods for instruments of the Middle Ages. (E.D. Heron-Allen VIOLIN-MAKING: AS IT WAS AND IS (Ward, Lock & Co. Limited London and Melbourne 1885 sec ed. 1861 first ed.) (Book in private collection of the author).
These are not furniture woods, nor are they woods for any other purpose in general. Luthier woods are in a class by themselves using species atypical to any other use. One cannot assume, for example, that the advent of cherry wood use in furniture in the Middle Ages is a sign post for when it was used for musical instruments. Since a Fyddle uses much less wood than, lets say, a chair, or bed, a small supply of the precious wood would be secured by the luthier first – the carpenter would only gain access to it for his larger projects as the supply grew. To assume that cherry wood, for example, did not enter into use in the Middle Ages until the 14th century because existent artifact furniture made of cherry does not predate the 14th century would show flawed logic. First, not all furniture from the Middle Ages has survived, in fact precious little. Second, because some artifacts from the 14th century, that have survived have cherry wood do exist, does not mean the cherry wood started use in furniture in the 14th century, only that some artifacts made of the wood survived from that period. Third, artifacts from earlier periods are increasingly rare, and furniture using cherry might have been made but, not survived. Fourth, we are talking furniture artifacts here not musical instruments – luthiers have always sought out and obtained the best wood. Since cherry, maple, and walnut, are the most suitable instrument making woods readily available, and they match reasonably close the European medieval woods available in period, it is reasonable to use them for authentic recreations of medieval musical instruments.
The above list of woods are good for recreations of medieval musical instruments and available equivalents in non European varieties (American cherry, maple, walnut) are in many cases all the American luthier can get other than exiotics not appropriate.
Patching, when necessary is done with a mixture of glue and very fine sawdust made into a paste -- as traditional and medieval method.
The design must withstand the pressure of 6 strings tuned to pitch pulling constantly on the neck and pressing on the top. (31.328 pounds of pressure)
The top is made of Spanish Cedar (bought from a luthier wood supplier -- aged 80 years or more costing $70.00) one eighth inch thick, 2 mm -- all quarter sawn.
The top of this instrument must withstand a constant more than fourty pounds per square inch of pressure pushing down trying to cave it in. Bracing is necessary to avoid disaster and deterioration of the table. This top has traditional cross and bass bracing.
The body is of cherry as well as the neck, pegbox and carved animal. The work on the box was started and an instrument finished in 1987. The top was broken in the move from San Diego 6 yrs ago and a new top, rose, inlays, finger board, pegs (purchased), bridge, and finish are all new. The box was reworked inside – especially the sides – making a much better instrument. Since the original finish on the outside of the box and neck were not removed, only thinned and new varnish applied over the old, the different older varnish gives a darker appearance to the cherry wood than on other current projects. The varnish used then was the same as now, however darker colophony (rosin) was used in the preparation resulting in a darker color.
The rose is cut from one eighth inch maple in a historically accurate pattern. The face inlays are of ivory (old piano key ivory) and horn, hand made and inlayed in the thirteenth century style. Marquetry is chosen and overlaid in proper period style and decor.
Gut strings are used as indicated from original sources and tradition.
Bracing:
Bracing is used on the underside of a top (table) to strengthen it and keep it from caving in from the pressure of the strings pressing down on the bridge (31.328 pounds of pressure). Some scholars believe luthiers of the Middle Ages used no bracing so the first instruments I experimented with had none. The tops caved in. The tables bowed inward and split. Clearly, these scholars were wrong. I used traditional bracing to stabilize the top and it works well. Bracing from the luthier class instruments of the Middle Ages does not exist in the artifact record. Since no tops have survived in any form (excepting Rotta tops which are quite different than later instruments), all we have to go in is luthier tradition and construction of folk instruments in cultures where the instruments have not changed or have changed little in the last one thousand years. Examination of bracing used by luthiers in the Middle East show much the same techniques an experienced luthier might expect -- "T" brace, Bar brace, Fan brace, and Bass bar. My fyddles use bar and bass bar brace. My guitarra latinas use a bar brace. This is a luthier skill and art that is very important to the success of the instrument and the finished tone as well as the instruments ability to hold up under tension. How each luthier applies bracing and the details is a closely guarded secret and represents their scientific endeavor for perfection.
Wood:
Select cherry wood was chosen for the body and neck. (European Cherry (Prunus avium)
The rose is cut from hard maple – durable and an important sound amplification feature. A small hand (finger twisted -- not mechanical not modern) drill is used to pierce the wood with tiny holes for the insertion of a jewelers saw. The saw is used to cut out the shapes in the design. Once cut, tiny files and a sharp knife, are used to finish the piece.
Ebony for bridge and nut.
Walnut for finger board
Spanish Cedar (old instrument quality wood – 80+ years old)
The model – one needs plans to construct an instrument. I make only medieval musical instruments. In the past I have made some Renaissance instruments but their construction is completely different than that of the Middle Ages. My interest and speciality is in instruments of the Middle Ages, therefore my information here is only for that time period.
Choose the instrument you wish to construct – get the manuscript picture or pictures – study as many variations of that instrument as can be found. Using knowledge of tuning and string lengths allowable for those pitches, get a max and min string length for the instrument. Now you are ready to measure the instrument in the drawing and enlarge it in proportion to the human figure holding it and matching the string lengths needed for a working instrument. I am always amazed that the dimensions I arrive at match the limitations of physics in string length requirements for a working musical instrument. The medieval artist draws the instrument in proportion to the human body -- so one can use the average five foot four to seven inch height to proportion the drawing and divine a size for the instrument.
I draw my plans first on large white or brown butcher paper, sold for wrapping packages for shipping and art etc. Once these plans are finished they are copied to poster board and a stiff template is made. Some times I also make the outlines in 1/8 inch plywood.
The template will be used to draw the body on the single block of wood chosen to become the new musical instrument body. The neck may be included in this or the neck may need to be attached separately to the body (always carve the neck attached to the body unless there is some reason – like the pegbox rises above the plane of the top of the ribs).
Once drawn the outline is cut. The body is ready to be shaped and finished to final couture on the outside. Forms are N/A in medieval instrument building for instruments of this type – carved from the solid. Forms are late 16th century and later luthier methods, except for large instruments, such as lutes, not cut from the solid block.
After the outside is completely finished, it is time to carve out the interior. The sides (ribs) and back should have a final measurement of 1/8 of an inch (2 mm) with a 1/4 inch lip (4 mm) for attaching the table on the top of the ribs. The whole instrument is a wood carving!
Mystic numbers, magic and golden circles – We have drawings from the luthiers of the 16th and 17th century indicating their use of golden circles and magic numbers in regard to designs. Numerology and mystical significance in numbers is well documented from the 11th century on. This tradition in the luthier arts is ancient and meaningful. Certain aspect ratios yield inner volumes of the body that produce a more resonant response to certain frequencies and balance over primary frequencies. String lengths are also absolute in nature – a certain pitch within a given register must be achieved with just the right string length and string diameter. There are limits of physics in dealing with strings and the luthier must know these and work with them in the model.
The following Table is from Craig H. Russell phd, Music of the Spheres: Love, Chivalry, and the Universe in the Twelfth Century M11404: Medieval Music – California Polytechnic State University San Luia Obispo
|
4 Seasons |
Spring |
Summer |
Winter |
Fall |
|
4 Elements |
Air |
Fire |
Water |
Land |
|
4 Winds |
Meridiano (South) |
Poniente (West) |
Levante (North) |
Tremontana (East) |
|
4 Ages |
Child |
Youth |
Maturity |
Decrepit |
|
4 Body Fluids |
Blood |
Cholera |
Phlegm |
Melancholic |
|
4 Qualities |
Hot & Humid |
Hot & Dry |
Cold & Humid |
Cold & dry |
|
4 Modes |
Dorian |
Phrygian |
Lydian |
Mixolydian |
|
7 Planets |
Sun |
Moon |
Mars |
Mercury |
Jupiter |
Venus |
Saturn |
|
7 Days |
Sunday |
Monday |
Tuesday |
Wednesday |
Thursday |
Friday |
Satruday |
|
7 Metals |
Gold |
Silver |
Iron |
Mercury |
Tin |
Copper |
Lead |
|
7 Organs |
Heart |
Brain |
Gall Bladder |
Lungs |
Liver |
Kidneys |
Spleen |
|
7 Qualities |
Good, Noble |
Melancholy |
Ardent, Fiery |
Variable, Inconstant |
Benevolent, Natural |
Creative, Good-Deeds |
Distant, Cold |
|
7 Virtues |
Fortitude |
Temperance |
Justice |
Hope |
Faith |
Love |
Prudence |
|
7 Note-Names |
A |
B |
C |
D |
E |
F |
G |
Music played an integral role in medieval philosophy and daily life. The concepts of love and chivalry are bound up in medieval philosophy and thus bound with music. Musical instruments are an embodiment of medieval philosophy and are instruments of love and chivalry (according to the Troubadours, the perfect embedment of love and chivalry). They must therefore be perfect, embodying the mysteries of the universe.
Tolerances – carving – musical instrument tolerances for tone – This is, for a master instrument, nothing less than high art – something one does not see, only hears. This is the dividing line between master and hack, yet people only see the outside. Some recent discoveries have shown that the 17th century masters use the sun to disclose unequal density in the wood and marked and scraped to even the density out. (Scientific American July 1989 - Stradivari’s Secret (Redux) Did baroque artisans "X-ray" wood with sunlight?) There is no reason to suspect this technology developed with the baroque masters since examination of existent renaissance instruments show the same knowledge of density mastering. Indeed, we have every reason to suspect that it reaches back to the medieval master luthiers. The problem is the lack of existent artifacts. Also certain areas are thinned for better response and others left a little thicker for strength and controlled responsiveness. The technology is as advanced as a high tech speaker system and a lot less quantifiable – relying on the art of the luthier master to get it right. This method of mastering an instrument is not born or originating in the 17th century – just carrying on a long tradition stretching back into the Middle Ages. This knowledge and master work is what you are paying for in a new master instrument of the violin family that costs over $10,000.00. In general, the back is one eighth of an inch thick (2 mm) and the ribs are one eighth of an inch thick (2 mm). These are starting points for the master, not finishing points.
Asymmetry is an important point to bring up here. The master luthiers of the sixteenth and seventeenth centuries give us a glimpse into the genius of the past. Bass strings require a different amount of wood density for response than treble strings. Surviving bridges with lopsided cuts and other asymmetry aimed at evening and quickening the response of the different strings – asymmetry in bridges, body, thicknesses, and cuts, all leading to a better instrument. Modern luthiers have lost this art and it is only now being rediscovered with the interest in early music and research into the original setup and outfitting of old instruments. I use some asymmetry in my luthering intentionally. This is part of the secret craft.
Other Materials:
Ivory and horn make up the inlays on the face and around the rose. (Ivory from old piano keys – it is legal). Horn for the pluctrum as well as. Many exotic woods are represented in the marquetry which was purchased in strips and then combined to make unique period type marquetry for the psaltry. The strips are made in the same way they were in the Middle Ages..
From my notebook drawings, most dating back to the seventies, I find design of bridges from illuminations which clearly show that detail. The design is period to the 13th century and for Spain. This is a point of creativity – I choose elements of an English bridge and elements of a Spanish bridge to create the carved artistic final result.
After the body is cut and shaped outside, the inside is carved out. Holes are drilled to honeycomb the interior, then, it is hammer and chisel time. The work is time consuming but progresses over time. The inside is then scraped with scrapers to dimension and work the instrument into a responsive state that hands and ears of the luthier are looking for.
The neck is joined to the body in a V joint (traditional Middle Eastern Luthier method) and the neck made true. A strait edge, such as a ruler, is laid along the finger board, from nut toward the bridge, and the measure taken of difference between the over hang of the ruler and the table at different points along the table -- one can easily see the neck and finger board are perfectly in the same plane and straight with the table. This is important to insure a proper action and setup. This joint must withstand the stress of the strings pulling – the V joint is traditional Middle Eastern luthier neck joint technique and is very strong.
Joining wood in the luthier arts is different than that of a carpenter or furnature maker. The wood on tops is usually two millimeters thick and must not be thinned more to get rid of deep small pockets of glue residue. That luxury is not a problem when constructing a table or whatever, when the boards are a centimeter or more thick. Good joinery in the luthier craft will still have some imperfections in this respect – since finishing is done by hand, not machine. This is why so many instruments have marquetry strips inlayed in their joins. An instrument without joint marquetry is strutting nice joints – small imperfections are accepted. The strength of a neck joint is critical to the success of the instrument and is a difficult non Western luthier skill.
Componants: All are period - glue, varnish (made from period recipe by me), strings, everything.
Time to construct:
Estimated hours to complete this project – 300 -- 400 hours or more. Time is hard to keep track of when you work on an instrument off and on for over two years. Keeping this in mind, the times are only guessed at. We must not forget the time to design the instrument from the original sources. Drawing of working drawings and making jigs or template models.
The rose is cut with a jewelers saw and takes about 80 hours alone.
The ivory and horn inlays are hand cut (piano key ivory) totaling 40 or more hours to make and inlay.
The body or the instrument is carefully hand dimensioned for proper tolerances using hand scrapers and chisels. Many many hours of work goes into this process to get it right – this is a master luthier art.
About three to six weeks of on and off time are required to properly finish the instrument in an authentic period style with period materials. (100 hrs at least). Varnish from period recipes must be made (time here is unknown but perhaps 30 hours to make varnish) and applied – not as is done with furniture which would spoil a musical instrument – but, with knowledge of the luther craft and arts.
Varnish is made from period recipes and required extensive research and development to execute, and learned skills to properly apply. Boiled linseed oil, terpentine (from pine sap), pine resin (best source is pure violin rosin), and saffron, are the component of the varnish I prefer (all from period recipies).
The over all instrument is seen as an art object as well as a functional musical instrument. The level of decoration is in accord with a noble or royal house.
The finish is an oil based period musical instrument quality varnish. About thirty coats of varnish are required to achieve the high luster and polish. No modern plastic or resin finishes are used. Modern violins, violas and cellos are the only instruments commonly found using oil varnish today, and only the most expensive of those in the $10,000.00 and up price range. The labor, in such a finish, greatly adds to the price of an instrument. Thirty coats of oil varnish with drying time between each coat and hand rubbing of each results in a nice but labor and time intensive finish.
Finishing – surface prep sealer, oil varnish, and polish – The arcane art of finishing a luthier family instrument and the mystic aura surrounding this process is legendary. This process is not the same as for finishing furniture. A musical instrument wood must remain unspoiled and untainted so it can develop. The cells of the wood contain pitch. As this pitch dries it crystalizes and leaves the cell nearly empty. This is why instrument makers pay large prices for aged wood, and is one of several reasons that in instrument gains tone and voice as it ages. This process takes about seventy to one hundred and fifty years to achieve. Certain treatments enhance and strip the pitch from the cells – wood allowed to soak in the bay of Verona for two to ten years allowed tiny microscopic sea animals to eat the pitch out of the cells. Some wood cut a century ago in Michigan, sank into the great lakes and was rediscovered recently. This wood, from the lake, also has the property of empty cells and is drawing a big price from luthiers. If you pay a big price or not, one does not want to spoil the potential of an instrument by gumming it up with oils or other foreign substances. The surface of the wood must be sealed, to prevent contamination of the cells. Sealing is done in one of three ways:
Coating the surface with a thin coat of instrument making glue.
Using a shellac. (Spirit based component that seals and does not sink in the wood)
Using sizing.
I prefer the shellac sealant over the other two options – the glue is not as good at preserving a clear vision of the wood (gets cloudy or dark) tends to be brittle and hard too – the sizing does not stick well to the oil varnish and it tends to sluff off or become gooey over time. Once the surface is sealed, the oil finish can be applied. Here is a listing of period recipes for instrument grade varnishes along with the source. I have experimented with some of these and have developed what I find to be a good varnish for musical instruments out of this information and some other source books I have on 16th century violin varnish. These are as early as the documentation on varnish gets.
The following is from VIOLIN-MAKING: AS IT WAS AND IS by E.D. Heron-Allen (Ward, Lock & Co. Limited Londan and Melbourne 1885 sec ed.)
THE VARNISH.
All the data we have to go upon are the printed works of some few individuals, who have written pamphlets on the various varnishes in common use for various purposes, and it is not unreasonable to suppose that the varnish used by the luthiers or fiddle-makers, was, to a certain extent, familiar to them ; again, the reading and proper construction of these formula is rendered more difficult by the fact that many of the gums, resins, and solvents mentioned, no longer exist under the names by which they were then known, and some would seem almost entirely to have disappeared. I will now recapitulate a few of the most likely formula enumerated in these ancient brochures. The first I have been able to obtain is a treatise called "Secrets of the Arts," first published in 1550, by one Alexis, a Piedmontese. He gives the following recipes:—
1. Place some powdered benzoin (a) in a phial and cover it with two or three fingers depth of pure spirits of wine, and leave it thus for two or three days. Into this ~ phial of spirits, put five or six threads of saffron (b) whole, or roughly broken up. With this you may varnish anything a golden colour, which will glitter and last for years.
2. Take white resin (vide note ) 1 lb., plum tree gum 2 ozs., Venetian turpentine (c) 1 oz., linseed oil 2 ozs.; break up the resin and melt it. Dissolve the gum in common oil and pour it into the resin, then add the turpentine and oil, and placing it on a light fire, let it thoroughly mix; remove and keep for use; apply slightly warmed. This is a good picture varnish.
Under this head would come a kind of copal, known variously as "Indian copal," "dammar," and "gum animi," which flows from a Sumatran tree called Vateria indiccz, which was, in former times, known as "white amber" or "white resin," or "white incense," which names were also given to a mixture of oil and Grecian wax, sometimes used as a varnish.
As the names of many of these gums, etc., may be unfamiliar to lay readers, I have placed an Appendix, descriptive of them, at the end of the book (Appendix A.), and the reference letters in the text refer thereto.
D. Alexii Pedemontani de Secrets Libri Septum. (Basle, 1603.)
3. A quickly drying varnish. Take frankincense (d) and juniper gum, powder them and mix them finely. Take some Venetian turpentine, melt it in a little vessel, and add gradually, mixing thoroughly, the aforesaid powders. Filter through cloth and preserve ; apply warm, and it will dry very rapidly.
4. Take gum-mastic (e) 2 ozs., Venetian turpentine 1 oz., melt the mastic on a light fire, adding the turpentine, let it boil for some time, mixing them continuously, but not long enough for the varnish to become too thick. Put it away out of the dust. To use it, warm it in the sun and lay it on with the hand.
5. Boil 3 lbs. of linseed oil till it scorches a feather put into it, then add 8 ozs. juniper gum and 4 ozs.• aloes hepatica (~, and thoroughly mix them; filter through cloth, and before using, warm in the sun.
6. Gum-mastic 2 ozs., gum-juniper 2 ozs., linseed oil 3 ozs., spirits of wine 3 ozs., boil in a closed vessel for an hour.
The author cites as colouring matters, sandal wood (g), dragon s blood (h), madder (i) steeped in tartaric acid, log-wood (j), Brazil wood (k), all dissolved in potassa lye, and alum, and boiled. Also saffron (b), cinnabar (1), and orpunent (in). He says, "Linseed oil will dissolve mineral and vegetable colours, but kills others."
Fioravanti in a brochure called "The Universal Mirror of Arts and Sciences," published at Bologna in 1564, gives the four following formula
1. Linseed oil 4 parts, spirits of turpentine 2 pts., aloes 1 pt., juniper gum 1 pt.
2. Powder, benzoin, juniper gum, and gum-mastic, and dissolve in spirits of wine. This varnish dries at once.
3. Linseed oil 1 pt., white resin (vide note , p. 173) 3 pts., boil together, and colour as you will.
4. Linseed oil 1 pt., resin 2 pts., pine resin ~. pt., boil till it thickens. Juniper gum must never be added to the linseed oil till it boils, or else it will be burnt. The oil should be boiled till it scorches a feather dipped into it.
He gives the same directions as Alexis, as to colours, and the solvent powers of linseed oil.
Beyond these two authors, formula become rather scarce, being chiefly brought from China. All these last, and the coming, formula are not to be taken as invented at the dates given, for they are from works in the nature of Encyclopedias, and consequently post-dated.
A priest of the name of Anda, in a pamphlet entitled "Recueil abrégé des Secrets Merveilleux," published in 1663, gives the following recipe :—Oil of turpentine 2 ozs., turpentine 1 ox., juniper gum ~ dram; to be mixed over a slow fire.
One, Zahn, in 1685, in "Oculus Artiflcialis," vol. iii., p. 166, gives two recipes:—
1. Elemi(n),anime (o), white incense, and tender copal (p),
2 drains each; powder and dissolve in acetic acid in a glass vessel, adding 2 drains of gum tragacanth (q) and 4 drains crystallized sugar; dry off this mixture and powder finely. Take 1 lb. of oil of lavender (r) or turpentine and 6 ozs. Cyprian turpentine (s), and boil them on a water bath. When the turpentine is well dissolved add the powder and mix thoroughly; boil for three hours.
2. Oil of lavender 2 ozs., gum-mastic 1 oz., gum-juniper 1 ox., turpentine .~ ox.; powder the mastic and juniper, and boil the oil, then add the turpentine, and when dissolved add the powders and mix thoroughly.
The Rev. Christopher Morley in 1692, in "Collectana Chinictea Lydensia," gives under the name of "Italian varnish," the following recipe
Take 8 ozs. turpentine and boil on a fire till it evaporates down to 1 oz.; powder when cold, and dissolve in warm oil of turpentine. Filter through a cloth before use.
And, lastly, a Jesuit, named Bonanni, in his "Traité des Vernis," published at Rome in 1713, gives a list of substances used, in which lie includes—i, Gum-lac in sticks, tears, or tablets (i); 2, Sandarac (u) or juniper gum; 3, Spanish or American copal, hard and soft; 4, Amber (v); 5, Asphalte (w); 6, Calabrian resin or pitch; 7, A little-known gum which flows from the wild olive-tree, resembling red scammonmum.
Besides these he mentions as gums not used for varnishes, elemi, anime, arabic (x), pear-tree, cherry -tree, azarole—tree (vide p. 131), and other tree gums. He also alludes to gamboge (y), incense, myrrh (z), oppoponax (a a), ammonia, oils, such as turpentine, copaiba (b b), etc. It will be observed that he omits benzoin, and mistakes when he classes amongst useless gums elemi and anime, which (especially the former) are much used for violin varnishes on account of their tender qualities, otherwise his list is practicably one of the modern ingredients of varnishes for all
1 Sandarach, or rather what is sold as such, is a mixture of the resin described in note s~, Appendix A, with dammar and hard Indian copal, the place of the African sandarach being sometimes taken by true gum juniper. These gums are insoluble (or nearly so) in alcohol, and consequently the sandarach (or pouucé~ of the shops) is useless to the violin-maker. True sandarach is the pure gum of the common juniper, and appears in the form of long yellowish dusty tears, and such you must see that you get. And for this reason I have always in this chapter made use of this term gum juniper in preference to the better known term sandarach purr~,~t a. He gives many formulai, the bases of which are principally mastic, juniper gum, copal, linseed oil, and oil of lavender. It would be easy to multiply these old formula, but space forbids it; the foregoing arc doubtless the most important and useful of them, as giving us a good idea of what materials the old Cremona varnishers had at hand; their varnishes, of course, had to be most carefully suited to their peculiar requirements, and properly to ascertain this it is necessary to finc. (a) what part it plays in the construction of a fiddle, and (b) what qualities it must consequently necessarily possess. L Abbe Sibire in "La Chelonomie" thus sums up its ‘raison d étre
"IL faut que ces pates, parfaitement délayées, plus légères que massives, nourrissent los matériaUx sans masquer leur vertu, et adoucissent les sons sans les obstruer. Ce no serait pas la peine d avoir pris tant de pr~cautions avec le compas [du violon], pour les annuler avec les drogues. Emaillez tant qu il vous plaira, mais n assourdissez pas. Quand je vous commande un violon, je souhaite qu il soit joli, mais j entends qu il soit hon ; et mon oreille, indignée et jalouse, ne vous pardonnerait pas d avoir, a ses dépens, travailld pour mes yeux.
Translation of the French (" La Chelonomie " thus sums up its ' reason d ?tre " IT is necessary that this pates, perfectly diluted, lighter than massive, feeds los materials without masking their virtue, and eases sounds without blocking them. This no would be not the punishment(effort) d to have set so much percautions with the compass [of the violin], to cancel them with drugs. Enamel so much that he(it) will please you, but n dim(deafen) not. When I command(order) you a violin, I wish whether he(it) is beautiful, but j listen whether he(it) is hony and my}(Bablefish)
Before beginning to consider the matter we must get rid of all notion of colouring the wood before varnishing, or staining it with acids and other corrosives to give the appearance of age and all such inventions of the Evil one, which acids sink right into the unprotected wood as into blotting-paper, and invading the innermost heart of the fiddle~ where they have no business to be, destroy its most sovereign qualities without performing any of the proper functions of varnish. Its first and great function is, of course, the preservation of the wood without it no fiddle could attain an age of more than a very few years, and the tone would lose sweetness and power after a very short existence of harmony. On its nature also a great La1 depends: it must be tender, in a manner soft; that. ~s, it must yield to the movements of the wood, and not encase the fiddle like a film of rigid glass. It is well known that in hot weather the wood expands, and in cold weather contracts on a violin, imperceptibly perhaps, but none the less actually, and the nature and quality of the varnish must be such as to allow of its following these movements of the wood to which it is applied, without checking them in any way, as it certainly would if it were too hard. It is this that gives the oil varnishes such a vast superiority over spirit varnishes, though the former are more difficult to compound and apply, and take weeks, months (nay, years), to dry properly. Gum-lao has this same hardening effect upon varnishes, though it has been most freely and disastrously used, in the recipes given below I have specially excluded a1l such, and all spirit varnishes. To obtain this suppleness, the gums must be dissolved in some liquid not highly volatile like spirit, but one which mixes with them in substance permanently, to counteract their own extreme friability. Such are the essences of lavender, rosemary, and turpentine, combined with linseed oil.
If these conditions are borne in mind, a glance at the above formula will show that they are all adapted for application to musical instruments in a greater or lesser degree, though most of them would require, at any rate, diluting. For instance, among those of Alexis, the Piedmontese, No. 1 is hardly more than a stain, and would require the addition of gum mastic and juniper to give it consistency. No. 2 would be tender, but too heavy; the same remark applies to Nos. 3 and 4 ; they all require diluting with essence of turpentine, and so on throughout. A moment s consideration of each will suggest the dilution or alteration required to make it useful for the purposes of the fiddle-maker. Again, by a looseness of diction the old masters have been cited as covering their fiddles with an "oil-varnish," without stating whether the oil employed were an oil properly so called (as linseed oil and the like) or an essential oil (such as oil of turpentine). It has appeared in the foregoing remarks that the old varnishers used to begin by boiling their oils to an extent sufficient to render them siccative, and then after cooling they mixed in the necessary powders, having re-heated the oil to a lesser degree, otherwise the high temperature necessary to boil the oil would burn the delicate resins and gums which they~ employed. And in this they differed from the manner in which the hard glassy spirit varnishes of to-day are made.
M. Savart has made the extraordinary mistake of preferring a hard spirit varnish of gum-lao, but it is difficult to imagine by what circuitous route he can have arrived at such an erroneous conclusion. It has been said that Stradivarius and his predecessors varnished with amber, but strong evidence against this is brought by the fact, that the secret of dissolving amber and hard copal was not known until 1744, when letteis patent for the discovery were granted to one Martin. His operation was to fuse amber and hard copal by dry heat, and dissolve it in boiling oil, which was diluted with an essence raised to the same heat before it was added. This operation was, indeed, invented in 1737, but as this was the year in which Stradivarius died, he could never have used it, much less his predecessors, as stated by Otto, and besides, a varnish so compounded would be much to~ hard to use on violins for the reasons before stated.
Setup the art of making the instrument playable –
The bridge was chosen from period drawings and paintings show this detail and cut from ebony with a maple under base for contrast. The nut was also cut from ebony and both bridge and nut were then hand fitted to the instrument and prepared for strings. Now we consider the height of the bridge, the fit of the nut and cutting of the groves in the nut and bridge. The relationship of the strings to the fingerboard, frets, tailpiece and end-pin. Again, we are faced with art as well as knowledge. The tolerances differ for differing types of instruments and whether it has frets or not, bowed, or plucked. (I have a medieval bell cast from the original 13th century mold that plays a perfect D pitch A440) Pitch is established at A440 from medieval source in the author’s collection I use a tuner to tune the instrument once strung and then carefully place each fret in perfect tune (medieval tuner is called a monochord). Frets are not inset as they are on modern instruments – some are tied gut, others are strips or wood, metal, ivory, or horn, glued to the fingerboard.
The string distance from the fingerboard at the nut is variable, depending on the type of instrument, but runs about 1/32 of an inch in general (this is simplistic but I am trying to give some reference tolerance for beginners to work from). The cut of the nut should not be too tall with deep groves, but only tall enough to allow the strings to fall into a grove and hold. Too much nut above that can cause buzzing and poor appearance as well as breakage of the strings -- there are exceptions such as a high wall needed to keep the string in place due to the angle the string come from the peg box..
The strings must not be too close to the fingerboard or sounding board, nor too far away, and travel evenly along the board only widening the space slightly by the end toward the bridge. If too close, they buzz. If too high, they are difficult to play and cause the performer to slow, fumble and have pain. A good instrument is easy to play. This relationship is achieved by adjusting the nut, bridge and fingerboard. It is an art and craft that takes time to master. If at first you have difficulty, keep working with it. First discover what needs to change to make it right. Care and patience will reward you with a fine playable instrument. (This assumes you know how to play the instrument).
The use of gut strings changes a set up greatly – increased space for more elastic and vigorous vibration must be considered to prevent the string from hitting the sounding or finger board.
Setup on this Guitarra Latina is perfect for use of gut strings and the proper playing technique. The neck exists in a perfect plane, straight with the body – use a straight edge along the top of the finger board and see that the line of the straight edge that overhangs the table (top or sound board) is the same, even measurement at all points – existing in space the sum of the finger board and fret thickness above the table. The measurement is equal all the way to the bridge, proving the trueness of the neck angle and the perfect set of the finger board. The frets are shallow as indicated in the many illuminations of citole and guitarra of this time period and in keeping with the same depth of a wrapped gut fret – the other common fret method used at this time. Proper playing technique is necessary to work with this instrument, just as with any new instrument, one needs to know how to play and the ability to play another instrument does not automatically give one the skills to play this one. The string placement - nut to finger board – is optimized for the use of gut strings. Extra space MUST be allowed to prevent the strings from buzzing – extra in comparison to what the space would be if strung with nylon strings. Nylon is less elastic and requires a higher tension to achieve the same pitch, thus the nylon vibrates less vigorously than gut.
Finger boards are shown to be for all intents and purposes flat with very little curve if any – this practice of curving the board is late Renaissance and only in mild amounts – we do not see curvature on finger boards as in the violin family until the late 18th century. Existing baroque finger boards on these instruments are nearly flat and very different than the modern setup. Seeing an early violin does not help unless it remains unchanged from the original short straight (non slanted neck) along with the wedge finger board. The finger boards on my fiddles are correct and do not show my lack of craftsmanship (I have made the curved finger boards on Baroque gambas). The surviving instruments in traditional cultures today are also constructed in similar fashion and this evidence must be considered.
The luthier craft is a complex one, requiring a knowledge of many special skills and concepts. In light of this, a carpenter, wood carver, or cabinet furniture maker does not have these skills, and cannot have them without years of person to person apprenticeship such as I had with Mr. Johnston (age 89 in 1972) 1972-1974, Mr Peterson (age 92 in 1984) 1982-1984) and Mr. D. Jones 1992-1993. The choice of the wood, the cut of the wood, the feel, bend, tone tap response, as well as the proper set up and tension are all highly guarded craft secretes. These things are also not easily imparted to words in a book and not able to be imparted due to the hands on complexity of the subject.
As to choice of woods – again – the most reasonable match to period types -- that are available – are used for my instruments. Just because one does not see cherry wood in medieval furniture til the 14th century does not mean it is not used earlier in musical instrument building. Woods not seen at all in furniture of the Middle Ages are used in instrument building including ebony.
Marquetry – inlays and overlays – The two color pictures below are 13th Century Arabic designs showing detail. These mosaic principals come down from the Romans who used the shapes in glass. Once built in large scale with glass, the Romans heated and drew out the glass effectively miniaturizing the design. This technique was used to produce finely detailed glass beads. This design from continued, preserved by the Arabs. The marqetry art (mosaics in wood) and inlays of mixed materials (ivory, horn, mother of pearl, abalone and woods) became the standard for decoration in the Middle Ages and can be seen on most instruments depicted in paintings and illuminations during this period.
This process was developed in Spain around the 12th century – influenced by the Moorish dominated culture. The art spread through Europe and carried on into the 17th century on musical instruments - still continues to this day on furniture. Some remnant remains on musical instruments, such as the guitar rosette and the violin family’s purfiling.
The Cantigas de Santa Maria are a wealth of information on musical instruments of the Middle Ages (especially the 13th Century), however, the drawings are illumination in miniature lacking detail on the design of the inlays and carving of the roses. To arrive at an accurate period documentation of these items one must consult painting of the 14th century of musical instruments and 13th century Arabic designs (mostly floor tiles). We can see inlays on the instruments of the Cantigas but not the details.
Wood carving or figures and designs (including the rose), marquetry, and mosaic inlays are the three forms of period musical instrument decoration used in the luthier arts.
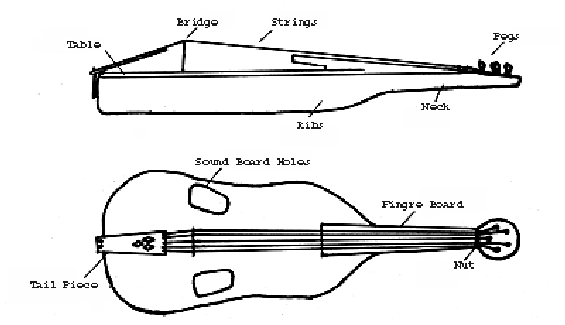
Parts of a luthier family musical instrument
The Nut – Starts the vibrating point of the strings
The Bridge – Ends the vibrating point of the strings
End Pin – Where tail piece gut is attached
Tail Piece – Item where strings attach after moving over the bridge – not a feature on all luthier instruments – common on instruments of the fyddle family.
Finger Board – A platform designed for fingers to touch strings and support for production of notes on the musical instrument.
Peg box – The place where the tuning pegs are found attaching the strings to the tuning area of the instrument.
Tuning Pegs – Features designed to allow the tensioning of strings so that the proper pitch may be obtained.
The Table – The sound board, the top of the instrument – usually pierced with sound holes of some kind.
The Ribs – The side walls of an instrument.
The Back – The back of an instrument.
The Neck – The area between the back and the pegbox – supports the finger board.
![]()
![]()
You are Visitor #